By Kappa Category webdev
Tags webmention indieweb blog pelican ssg static site generator theme
Estimated Read Time: 18 min read
Ninja Level:

Photo credit: John Schnobrich (Unsplash license)
Introduction
I had tried to use IntenseDebate and Disqus with this blog. I found the layout of IntenseDebate is outdated. Automattic did not update this project for a long time. It is a maintained state without new development. For Disqus, it had two problems. Looks like it may display Ads for the free plan. Also the long loading time for a webpage could be a problem. Below is a table that displayed the amount of data transferred by loading a single page. The amount of data transferred from Disqus or Disqus CDN is quite large.
| Domain | Bytes |
|---|---|
| c.disquscdn.com | 252,636 |
| cdn.jsdelivr.net | 154,129 |
| cdnjs.cloudflare.com | 100,758 |
| connect.facebook.net | 62,944 |
| www.kappawingman.com | 52,846 |
| apis.google.com | 41,215 |
| ssl.gstatic.com | 25,158 |
| kappawingman.disqus.com | 22,841 |
| www.google-analytics.com | 18,469 |
| fonts.gstatic.com | 17,728 |
| browser.sentry-cdn.com | 17,650 |
| disqus.com | 16,947 |
| a.disquscdn.com | 1,644 |
| res.cloudinary.com | 1,336 |
| fonts.googleapis.com | 1,087 |
| accounts.google.com | 374 |
| webmention.io | 50 |
| referrer.disqus.com | 43 |
| www.facebook.com | 0 |
| realtime.services.disqus.com | 0 |
This image below shows that about half of the loading time of a website was spent on loading Disqus. Total loading time is 12 seconds (an emulated older version of Android). The total loading time on a desktop should be about 4 seconds.
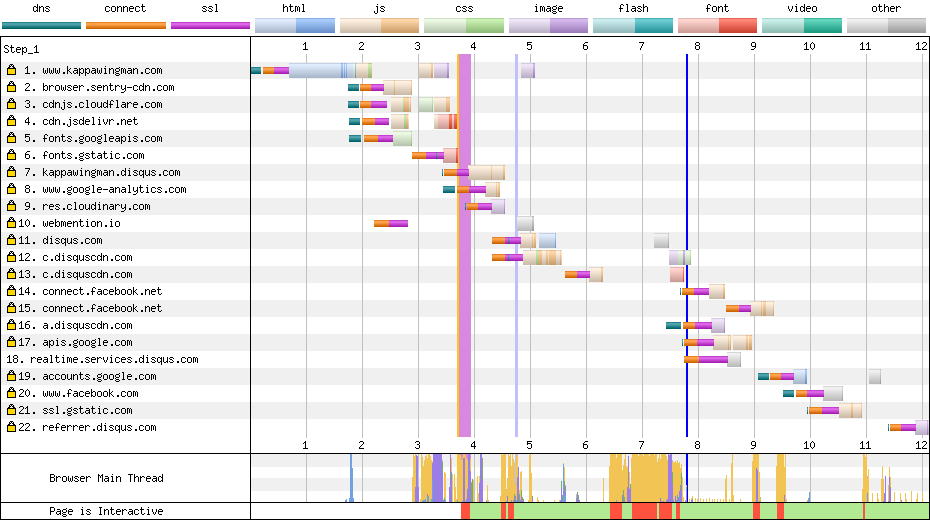
So I decided to stop loading Disqus and start looking for alternatives.
Enter Webmention
Webmention is a W3C recommendation, which provides a way to notify any URL when it was mentioned on other websites. It could also be used for comments, reply or pingbacks between two different people. Webmention was initially developed or designed by IndieWebCamp. In 2017, it became a W3C recommendation.
Webmention is a improved version of Pingback. It does not use XML-RPC for communication. Also, it is better than trackbacks (less spammy or less fake messages) because of stronger URL checking mechanism in Webmention. This article from wpmudev explained it in detail.
The principle or tenets behind IndieWeb is own your data. It is a huge topic. Webmention is one of the 'building block' of Indieweb, also mentioned by Chris Coyier.
In this article, we focus on how to enable Webmention in Pelican. The steps are similar for any other static site generators or website. You should also configure the parameters to use in the template in pelicanconf.py.
Before we get into details, I recommended using Indiewebify.me to keep track and test if your setting is working. If you are not sure or getting lost, run each checking procedure. Fix the problem and move to next step.
Authenticate to Indieauth
For my blog, I use webmention.io.
We need a way to let Indieauth and other authentication implementations know you are the author of the webpage. It's the rel="me" entry.
Add this in the head section of the your home page:
1 | <link rel="me" href="https://github.com/Your-Username" /> |
GitHub was used in here. Make sure your GitHub profile contains the URL of your home page.
Then you could sign-in to webmention.io by Indieauth. Refer to Indieweb authorization endpoints for more details.
Next, we need to add the h-card and h-entry into the articles.
h-card
h-card is in microformat2. h-card is used to specify the details of an author. A sample h-card looks like below. Add the elements inside your article. Note I didn't have styling because I had hidden the h-card with CSS. Feel free to design your own h-card and add other meta tags.
1 2 3 4 5 6 7 8 9 10 11 12 13 14 15 16 17 18 | <section class="h-card"> <p> <a class="u-url u-uid" href="{{ SITEURL }}"> <span class="p-name">{{ AUTHOR }}</span> </a> : <span class="p-note">{{ SITE_DESCRIPTION }} </span> </p> <span>Social contact:</span> <br> <ul> <li> <a class="u-url" rel="me" href="https://github.com/{{ GITHUB_USER }}">Github</a> </li> <li> <a class="u-url" rel="me" href="https://twitter.com/{{ TWITTER_USERNAME }}">Twitter</a> </li> </ul> </section> |
The important elements that were added:
- class="h-card" add to <section>
- u-url points to the URL or home page representing the person or organization
- u-uid is the unique ID and ideally points to the canonical URL of your home page
- p-note is the additional notes
Since we are using Pelican, we could add the h-card and h-entry elements into the suitable place in the Jinja2 article template.
h-entry
h-entry is in microformat2. h-entry is mainly used to specify the metadata of an article. A sample h-entry looks like below. Add the elements inside your article.
1 2 3 4 5 6 7 8 9 10 11 12 13 14 15 16 17 18 19 20 | <article class="h-entry"> <h1 class="p-name">Using MeiliSearch with Pelican</h1> <a class="p-author h-card" href="https://www.kappawingman.com/author/kappa/"> Kappa Wingman</a> <a class="u-url" href="https://www.kappawingman.com/posts/webdev/2020/07/03/using-meilisearch-with-pelican/" rel="bookmark" title="Permalink to Using MeiliSearch with Pelican"> </a> </h1> <span class="published"> <time class="dt-published" datetime="2020-07-03T23:20:02+00:00"> 2020-07-03</time> </span> <span class="p-summary">Using MeiliSearch with Pelican</span> <div class="e-content"> <p>Blah blah blah</p> </div> </article> |
The important elements that were added:
- class="h-entry" added to <article>, then all extra elements in below are within the <article>
- p-name - Entry name or article title
- p-author h-card - These two had to be together. This entry is to specify the author of the article
- u-url - Permlink to thr URL of the article
- dt-published - The Publish timestamp of the article
- p-summary - Summary of the article
- e-content - The full content of the article. Edit: I just found the length of e-content could be very long. Some receivers may not trim it and display it fully. So you may consider trimming your e-content or use a shortened summary as the e-content.
- If you want to send Webmentions to links you had mentioned in your article, those links have to be inside the block of the h-entry.
- Check out Indieweb Comments too
Receiving Webmentions
Basic steps to receive Webmentions:
- The articles should have
- Specify the Webmention endpoint
- Enable h-card and h-entry in your articles
With the above setting, when a Webmention is being sent, a remote program could scan the article for the h-card and h-entry microformat. Then the remote program extracts the elements from the article and send the Webmention to the endpoint.
Specify the Webmention endpoint
You could self host your endpoint or using webmention.io for free. Inside the head section of your article, specify:
Replace username by your username in webmention.io. If you don't want pingback support then remove the last line to turn it off.
Displaying Webmentions in the blog
There are several methods. During generation of the static pages by Pelican, you could integrate tools fetch webmentions and include it in the static pages. This method is more complex. Check out the plugin by Desmond Rivet and a gist by stuartlangridge.
An easier method is to use a JavaScript to display it in client side. But the client side requires a bit more workload or network connections. For my blog, I use webmention.js by Fluffy. Just a few steps to add in your Pelican template.
Edit: Article updated on 2020-08-05. Inspired by Desmond Rivet webmention plugin and other pelican plugins about webmention, I am now using my plugin to include Webmentions into my static pages. I had cached the Webmentions as a single file so there is less loading when I rebuild my websites. Also, there is less traffic for client side connecting to webmention.io when they browse the web page.
Sending Webmentions
Since I am using webmention.io, I could also use it to send webmentions too. Add a form inside your template. For my template, it is something like below. There some styling because I use Bootstrap.
1 2 3 4 5 6 7 8 9 10 11 12 13 14 | <section> <form action="https://webmention.io/{{ WEBMENTION_USERNAME }}/webmention" method="post" class="form-webmention"> <span class="mt-2"> <label for="form-webmention-url">Input the URL of your article that had mentioned my article:</label><br> </span> <div class="mt-2 d-flex row"> <input id="form-webmention-url" class="col-md-8 col-md-auto ml-1 mr-auto flex flex-row" type="url" value="" name="source" placeholder="" required/> <input name="target" value="{{ SITEURL }}/{{ article.url }}" type="hidden"/> <button type="submit" class="btn btn-nero col-md-3 col-md-auto ml-auto mr-1 flex flex-row">Send Webmention</button> </div> </form> </section> |
You could test it at the end of my articles.
We had discussed about how to enable Webmention in Pelican. Happy mentioning. Til next time.
Further reading
- IndieWeb - There are lots of topics to explore: About IndieWeb, Webmention, Micropub, POSSE: Publish (on your) Own Site, Syndicate Elsewhere, PESOS: Publish Elsewhere, Syndicate (to your) Own Site and etc.
- People changed from Disqus to Webmention
- So So long Disqus, hello Webmention by Nicolas Hoizey
- Bye Disqus, hello Webmention! By Evert Pot
- An In-Depth Tutorial of Webmentions + Eleventy by Sia Karamalegos
- Indieweb pt2: Using Webmentions in Eleventy by MaxBock
- Telegraph by Aaron Parecki For sending webmentions
- Webmention.rocks A website for testing your webmention implementation